Friday, July 6, 2012

No-Refined-Sugar-Added Raspberry Jam


The other day, I went on a mad search for strawberries; I didn't realize that the season was ending so quickly!  My usual local farm stand was out, but they had beautiful raspberries. 
I did find strawberries at another fruit stand and commenced an evening of jam making. I made 3 batches: a full-sugar strawberry rhubarb (I was nervous about a low or no sugar version since rhubarb is so sour), strawberry jam sweetened with apple juice concentrate and honey, and raspberry jam sweetened with just apple juice concentrate.  I got recipes for the second 2 jams off the label of the no-sugar-needed Ball pectin jar that I purchased this year.  Here is the process for the no-sugar added raspberry jam:

Start by washing the berries (I added 5 drops of lemon essential oil to the wash water as an extra antimicrobial wash) then mashing them in a single layer with a potato masher.  You will need 2 cups of mashed berries for each pint of jam.


Add 1/3 cup of thawed apple juice concentrate to the berries in a deep, non-aluminum pan. (I made 3 pints worth so used 1 cup of concentrate).


Sprinkle the pectin (this recipe calls for 1 1/2 tablespoons per 2 cups of fruit; and make sure you use pectin designed for low- or no-sugar canning) over the fruit and juice mixture and stir well to combine.


Over high heat, bring to a rolling boil that cannot be stirred down and boil for 1 minute. (Be careful, it is really hot and has a tendency to spit at you!)


Use a spoon to skim the foam off the surface of the jam.  If desired, you can add 1/4 teaspoon of butter with the pectin before boiling to cut down on some of the foaming.


Ladle the hot jam into clean, sterilized jars (a canning funnel is indispensable), wipe the rim with a hot wash cloth, and cap with a clean, sterilized lid and ring tightened down gently.


Process in a boiling water bath (submerge the jars at least a couple inches below the surface of the water and put the lid on) 10 minutes if you live below 500 feet elevation (you will need to add additional time if you live at higher elevations, usually an extra 5 minutes for each 1000 feet).


The fruits of my labor:  a fruit-heavy, tart rasperry jam!  It even made an extra 12 ounce jar!


Tuesday, March 20, 2012

Springtime Strawberries

Maybe it's a bit premature, but today is the first day of spring and that puts me in the mood for strawberries.


So when I saw these beauties in the produce section for $2/lb I decided to take a chance. Strawberries are truly a superfood : high in fiber, antioxidants, vitamin C, and manganese. One cup of strawberries is just 43 calories and provides 136% of the RDA of vitamin C and 13% of the RDA of fiber. The red pigments are antioxidant, the phenols are anti inflammatory and that combination is protective against cancer and age-related deterioration of the eye. Strawberries are also a good dietary source of manganese, an anti inflammatory and antioxidant mineral that contributes to bone strength and cardiovascular health. Along with other berries, strawberries are a low glycemic food; combine this with all the properties mentioned above and they are a smart choice for a sweet treat for diabetics.

I was pleasantly surprised by how good these strawberries from California turned out to be (they were the perfect accompaniment to our breakfast for dinner tonight)!


But I'm really looking forward to when the strawberries in my garden will ripen so I can have them my favorite way: plucked fresh and warm from the sun!
What a yummy way to welcome spring!

Thursday, March 15, 2012

Meal Planning and Grocery Shopping Tips

"What's for dinner?" This used to be a question that caused a lot of angst in my life. Often asked in my own head—but also by my husband or one of my children—in the late afternoon or early evening, it would put me into a state of agitation: searching through the fridge, freezer, and pantry to see what we had on hand and what I could possibly create. Dinner was usually a thrown-together affair (though even in these frazzled times, it was still most often made from scratch) served late in the evening. Grocery shopping, while less angst-ridden, was often inefficient, off-budget, and very frequently included the purchase of perishable items that went bad before they were used or unneeded items that got lost in the pantry.

After literally years of dreading the question "what's for dinner?" I finally wised up and developed a plan of attack to save my sanity (and my grocery budget). This plan involved 3 key components:

  1. Organizing the pantry (and the fridge) and keeping it stocked with bulk items that we eat frequently.
  2. Creating a weekly meal plan.
  3. Creating my shopping list(s) using a simple equation: All ingredients needed to make the dinners for the week – pantry items already on hand = weekly shopping list(s).
The Pantry

I dream about a walk-in pantry like the one we had growing up, but my "pantry" actually consists of a large cupboard in the garage, another in the house, a drawer in my buffet for potatoes, onions, winter squash, etc, and my spice cabinet. There used to be no real rhyme or reason to the organizational system—mainly it relied on my semi-photographic memory of where I had stashed something (which failed terribly when the boys or my husband would rummage around for snacks). Now, I've created an organization system that works much better for my space—the key being that items are much more easily visible, bulk containers are labeled with their contents, and shelves are organized by category (eg—baking supplies, canned savory foods, canned fruit, dried pasta, rice, beans, and snack foods are separated into specific locations). See my nicely organized pantry:


You should organize your fridge and freezer in the same way. I haven't taken the final step to complete organization by making an inventory, but can definitely see the value in that (it would save the perusal through the cupboards, fridge, and freezer that I do as I complete my shopping list each week). It would also help keep food from expiring before you get around to using it.

The Weekly Meal Plan

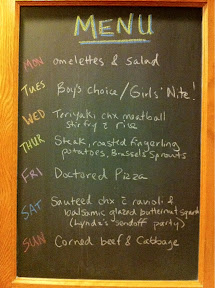
At my house, this means planning home-made dinners (with occasional eating out) for the full week. I usually make big enough meals that there are leftovers—either for another dinner to eat the next night, to freeze for later, or to be lunch for my husband and I the next day. Breakfast and lunch are pretty much fend-for-yourself meals at our house but I make sure we have ingredients on hand for both. I'm fortunate to be able to be home early enough most evenings to cook unhurried dinners from scratch and my meal planning works around the nights I work later and don't have as much time to cook. Even if you work full time, you could still plan home-made meals for the week and do most of your prep work and cooking on a day off so all you have to do is throw a pre-made dish in the oven when you get home or toss together pre-prepped items (such as a quick stirfry). Here's my meal plan for this week (I painted my cupboard doors with chalkboard paint just so I could do this):


As I plan my dinners, I try to include a variety of proteins, veggies, grains, etc. so we aren't eating the same thing over and over—it's a very loose rotation diet (which helps reduce the development of food allergies—I'll plan to write a post about this in the near future). I plan more elaborate dinners for the nights I have more time to cook and easy dinners (soup & sandwiches, tacos, doctored pizzas, and frozen leftovers are typical for us). Over the past year, I've also made an effort to have one meal a week where one my boys is in charge (for Christmas 2010 I make them aprons, chef hats, and oven mitts and gave them kid-friendly cookbooks—look for future posts about cooking with your kids). Having your kids help with cooking goes a long way with picky eaters!


The Shopping List(s)

Working from one day of my meal plan at a time, I determine the necessary ingredients, check if I already have them on hand, and whatever I don't have goes on the list. Focusing on one meal at a time helps me make sure I don't forget anything and thus eliminates extra trips to the store. After I've got everything for dinner, I'll add extras for breakfasts and lunches such as milk, sliced bread, cereal, fruit for snacks, etc. If I've stayed with my plan, this usually means that I only have to grocery shop once a week and I make a trip to Costco about once a month. How you make your list is up to you but I paid for an app for my iPhone that memorizes items as I add them, let's me indicate quantity, categorizes items by where I find them in the store, creates separate lists for separate stores—an even lets me email the list to my hubby on days when he's kind enough to do the shopping on his way home! Otherwise, I would recommend creating master lists on your computer where you can highlight the items you need and add to it as necessary.

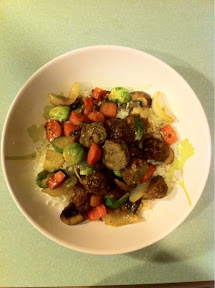
So, that's how I rid myself of "what's for dinner" angst! And just for fun, here's a pic of last night's dinner from my meal plan:


How do you approach meal planning and grocery shopping? Does it stress you out? Are these tips helpful? Please share!

Wednesday, March 7, 2012

Packing a Lunch for School


This post came about after reading about the “Pink Slime” in the Huffington Post this morning. Getting good and nutritious food for our school kids is such an important issue as it can affect so many aspects of their lives: learning ability, emotions, and physical activity. Having a well fed kid can make the difference in their attitude and how they interact with those around them. The most immediate thing I can think of to help combat the food problem in schools today is to pack your kids lunches yourself.  Next would be advocating for better lunches to be served in schools, but who knows how long this process might take? I would love to give Jamie Oliver a high five and join him in his crusade to improve school lunches. What we can all do right now is to sign his petition for better school lunches.
Here is what I am doing:
This year my little dude started preschool, and with preschool came my first foray into lunch packing for the kiddo. The school had some requirements: no packaged foods that have sugar as a main ingredient, no cookies or candy, and it must be packed in something that can be opened and closed by the kids themselves.
The first thing I tackled was the packaging. I took O to The Container Store and wandered down the lunch box aisle and had him practice opening and closing a variety of lunch boxes. We finally settled on this one. It holds a sandwich and fruits, veggies or crackers, and fits perfectly in the insulated lunch bag I found on the next aisle over (I was going to make one but I couldn’t beat the price). The downside of this box is that it does not hold soupy things (yogurt or applesauce) or juicy things (kiwis or sweet potatoes) and it is the only thing that fits in the bag so there is not room for a second container for the soupy and juicy lunch items. But it has served us well since September.

The items I pack are usually a PB and jam or honey sandwich on Dave’s Killer Bread, apples, carrots, and almonds or crackers. Sometimes I will try to slip in some celery sticks or cauliflower to see what happens, but they usually come home uneaten. My philosophy on food with my family is whole grains as much as I can and always offering a range of vegetables and fruit. I don’t get too hung up if he doesn’t eat everything I offer. I believe just having it around and being exposed to it will serve him well as he grows up and develops his own eating habits.
So if you can: brown bag it!
What do you pack for lunch for your kiddos? Share with us below in the comments or on our Facebook page.

Wednesday, February 22, 2012

The Doctored Pizza

I'm sure you've been there... shopping at a warehouse store, feeling uninspired and unmotivated to cook dinner from scratch for one reason or another (mine today being I've finally succumbed to the plague that has infected my family). And then you see it: the take-and-bake pepperoni pizza, on sale for $5.99, and you think, "Now that I can work with."

I have have a hard time pointing out any health benefits of pepperoni pizza, but I do know how to make it healthier. I have always argued that pizza can be a perfectly complete meal: it certainly covers all the food groups when you do it right. So, when life gives you pepperoni pizza, make combination! At our house tonight, that means add spinach, artichoke hearts, sundried tomatoes, and feta (to everyone but Big C's quarter--he likes apples sliced on to his when it comes out of the oven).


So, the lesson is: none of us can do it perfect all of the time, but we can always make it better!

Thursday, January 19, 2012

Easy Egg Breakfast

The hardest part about changing my eating habits is getting a good healthy breakfast. A friend passed on this quick, easy and mobile way to get a healthy portion of protein.

You will need:
One corn tortilla
One egg
A slice of cheddar cheese (optional)
A nonstick frying pan or a small amount of olive oil
Salt

Place tortilla in pan and start heating.
Once the tortilla is hot slowly crack the egg on top of the tortilla.
Break the yolk and the white, a little will run off the side but most of it will stay on the tortilla.
Sprinkle a little salt on and let cook for a few minutes.

Once the egg starts to set up flip the whole thing over.
Let cook for about half a minute till egg is cooked through.
Flip back over and slide onto a plate.
If you want cheese place a slice on one half and let melt.
Fold it like a taco and walk out the door with breakfast in hand.

Alternatively you could add tomatoes to the taco style fold.

Enjoy!!

Wednesday, January 18, 2012

Breaking Radio Silence

Chef Brett is back,after months of ignoring my blogging responsibilities I'm ready to share my culinary inspirations again. The holidays have come and gone, I weathered my first holiday break from preschool, and our first major health issue - tubes in my 3.5 year old's ears. I'm ready to cook again.
What should I cook? Well what I would like to cook is spaghetti ala carbonara (freshly cooked noodles tossed with hot bacon, eggs and parmesaen - the heat of the noodles and bacon grease cooks the eggs making a salty creamy noodle dish.) But I am not going to cook or eat at that because I want to build better eating habits. So last week I started a new system as follows:
  • Brainstorm meals for the week as a family on Sunday mornings
  • Plan four fresh meals a week
  • One day will be leftover day
  • Two days will be frozen food days (frozen food days can also be eating out days)
  • When making soups or casseroles will make enough to freeze to provide for the future frozen food meals

With this plan I am hoping to eat better and save money. I also am hoping to loose some weight by creating better eating habits.The healthy habits I am trying to implement are:
  • eating a salad type thing and/or steamed veg at every meal
  • only eating meat 3 times a week
  • making sure to snack more frequently so that while I am making dinner I don't eat two string cheeses and 3/4 cup roasted almonds (in smaller portions a healthy snack but when too hungry appetite ruining).
  • only eating when hungry, not just because the clock says its time to eat
Come back in a day or two and I will share this week's menu and some recipes! (Really, I will be here, I am recommitting to this blog and Doctor Crystal).

Tuesday, December 6, 2011

When the Dog Bites, When the Bee Stings

Both Chef Brett and I have recently shared some of our favorite kitchen gadgets with you (see here and here) and that inspired me to share some of my favorite (read practically indispensable) medically-oriented home items. So, read on and prepare to stock your alternative medicine cabinet!

HOMEOPATHIC REMEDIES
Whether they are single remedies like arnica montana (for trauma and bruising) and Apis mellifica (bee stings) or combination formulas for colds, flus, and teething infants, homeopathics are an indispensable part of my medicine cabinet. They stimulate healing, have no side effects, no drug interactions, and are safe for ALL ages.


ESSENTIAL OILS
I have a small collection of essential oils that I like to have on hand. Lemon is a natural disinfectant (I like to add 10 drops to my kitchen soap, a few drops in the garbage disposal when it's smelly, or a few drops in a sinkfull of water to wash produce!. I keep peppermint in the car (it's great for motion sickness--just hold it in front of the vent in the car!). I apply lavender topically when I burn myself cooking (I try not to, but it happens from time to time...). I also love some of my blends for immune boosting and stomach upsets.


TEMPLE THERMOMETER
I LOVE this (and I use it at my clinic as well)! Just hold it on your temple and you have an accurate temperature reading in 6 seconds--an absolute must have if you have an infant. And it's handy for older kids and adults too.


ALOE VERA & NATURAL INSECT REPELLANT
We're pretty outdoorsy at my house and these two items get quite a bit of use In the summertime. I'm not a fan of sunscreen so inevitably we get a few sunburns early in the summer before we've soaked up enough vitamin D and have a good base tan going. Aloe is great for soothing burns: store it in the fridge or even freeze it into cubes for even more relief! Most commercially available bug sprays are horribly toxic so we use essential oil-based ones at our house. Taking extra B vitamins and eating lots of garlic also makes you less appealing to bloodthirsty insects!


CASTOR OIL WRAPS & PACKS
I'm not a fan of castor oil internally (my midwife threatened me with it when I was overdue with my first baby so I went into labor rather than having to drink it ;). But used topically it is truly awesome. Used on the abdomen, it stimulates detox, aids digestion, and reduces inflammation (see here for instructions for use). The antiinflammatory benefit of castor oil also makes it a great choice for sprains and strains. Sprained ankle? Wrap with a piece of flannel saturated with castor oil under your ACE bandage to reduce swelling and speed your healing. It's great for carpal tunnel syndrome as well.


TEA, HONEY & GINGER
I always have an assortment of Traditional Medicinals teas in my cupboard. They have formulas for everything from menstrual cramps to coughs. While they may not be the most potent herbals out there, I love them for their convenience and accessibility. I usually fortify all their immune formulas by adding honey (see my post about honey's health benefits) and fresh ginger root (ginger aids digestion and has warming effects that help boost immune cell function).

And my absolute favorite thing in my home health toolbox...?


WOOL SOCKS!
Wool socks are the key ingredient in the amazing, magical hydrotherapy treatment that is warming socks! Warming socks are a wonderful way to boost your immune system. Worn for 3 nights in a row at the earliest sign of a challenge to your immune system, warming socks can knock out that cold and flu before it has a chance to incapacitate you. And they are great for kids too! For instructions on how to do warming socks, go here!

So, there you have it (though I guess I didn't cover dog bites, did I?). I hope you find this helpful--and timely too as these items make great stocking stuffers and holiday gifts!

Stay healthy everyone!
Dr. Crystal

Tuesday, November 22, 2011

When Life Gives You Apples...

I ALWAYS have apples in my fruit basket. Ever since my boys were big enough to chew, they have loved apples; it isn't uncommon for them each to eat 2 a day! Maybe that has something to do with their mom being a doctor...? ;) Apples are a good source of soluble fiber, pectin, which helps to lower cholesteral and aids the body in elimination of toxins. Apples are helpful in regulating digestion, improving both constipation and diarrhea. They are also a great source of vitamin C.


Recently, my mom delivered a bag overflowing with apples from her tree. They were less-than-perfect to look at and more than even my children could consume so I took the opportunity to play with my new kitchen toy: a steamer juicer! I had used it to make grape juice before, but apples were a new one. A wonderfully simple process, I filled the basin with water, heaped quartered apples in the steamer basket, covered, and left it on the stove for a couple of hours.

Here's the "before" picture:


After 2 hours, I drained off almost 2 quarts of apple juice into clean jars I had sterilized and kept hot in my oven set at 200.


The juice turned out thick, almost like a syrup, as it cooled and my kiddos didn't really like the mouth feel. So, what was I to do with it? I found a recipe for Delicata Squash with Rosemary, Sage, and Cider Glaze and it turned out FANTASTIC! It will be on my table for Thanksgiving this year (though this time I'll be making it with butternut squash as all the delicata was gone from my local farm store). So, when life gives you apples, make apple juice...and then make this!


Happy Thanksgiving and Bon Appetit!


Dr. Crystal


Tuesday, November 1, 2011

Mama Bean’s Kitchen Sample Menu and Survey

In addition to making delicious things for my family and sharing them with you all I have also been in the process of starting a new business called Mama Bean's Kitchen. We’ll be delivering prepared meals to customer’s homes that will simply need reheating or can be frozen for later use. The meals will be locally handcrafted using fresh, whole, sustainable ingredients. The first step I am taking in the business is to do a little market research. First I would like to introduce my menu then invite you all to take a short survey. As a thank you for taking the survey I will be sending out $5 off coupons to everyone who has taken the survey once the business launches. Thank you so much for your consideration and support in this new endeavor. Please feel free to send anyone a link to this blog entry you might think is interested in helping me gather data.


Sample Menu
Soups – $10-$14
Pumpkin Sausage soup (vegan & gluten free options)
Tomato Cous Cous
Minestrone (vegan & gluten free options)
Chicken Meatball with Orzo

Entrees – $12-$16
Risotto Pie (vegan & gluten free options)
Lasagna
Mushroom and Lentil Pot Pie (vegan option)
Chicken and Dumplings w/mashed potatoes

Baked Goods – $8-$18
Cinnamon Rolls
Savory Rolls (with cheese and herbs)
Pie (strawberry rhubarb, pumpkin, apple, seasonal) – dairy free option
Crisp (pear ginger, blackberry, seasonal) – vegan, gluten & sugar free (made with Maple Syrup)
Cookies (snickerdoodles, chocolate chip… who knows)

Follow this link to take the survey:
https://www.surveymonkey.com/s/mamabeanskitchen

Monday, October 24, 2011

Lentil Cakes!


We have recently shifted our family schedule around and therefore have had more time and energy by the time I get to the evening to make dinner. I have taken to pulling out my old Bon Appetite magazines and flipping through them to see if anything catches my eye. This first recipe I came across this week was South Indian Lentil Cakes with Raita.


I made a few changes based on the available ingredients in my pantry and what I came up with had my husband asking if I could make a giant batch to keep on hand so he could take them for lunches. My preschooler also enjoyed them, saying, "Yum!" after each bite, although he wasn't a fan of the sauce.
Raita is an Indian dipping sauce made with yogurt and cucumber and various other spices. Traditionally it is used to cut the spiciness that comes from most Indian foods in this application it is just a yummy sauce as I left out the jalapeños in both the sauce and the cakes hoping to please the palette of my 3 ½ year old. I want to introduce more hot spice into our menu but I have traditionally avoided it myself so what I want to do is condition my taste buds, as well as my family's, to tolerate more spice and adding more variety in our menu. We'll see how that goes…
In the meantime as I mentioned I left out the jalapeños so it should be generally pleasing to most palettes. The lentils and rice have to soak for 3-5 hours so plan ahead on this one.
Special equipment: a food processor.
Ingredients
For Raita:
¼ teaspoon ground cumin
1 cup plain yogurt
¼ cup cucumber, seeded and minced
1 teaspoon cilantro, minced
1 teaspoon basil minced*
1 garlic clove, minced
For Lentil Cakes:
½ cup lentils
¼ cup rice
1 garlic clove
1 teaspoon grated fresh ginger
¼ cup cilantro
¼ cup scallions
1 Tablespoon fresh basil*
1 teaspoon salt
1 teaspoon pepper
Oliver Oil (for cooking the cakes)


Raita –
Mix all ingredients together.
Lentil Cakes –
Rinse lentils and rice place in a medium bowl.
Add water to cover by 3".
Let legumes and rice soak at room temperature for 3-5 hours.
Drain legumes and rice; transfer to a food processor.
Add garlic and ginger and process until grainy paste forms.
Add next five ingredients and process till everything is just chopped, stopping to scrape the sides as needed.
You will have a wet "batter" now.
Heat 1 Tablespoon oil in a large skillet over medium-high heat.
Spoon 4-6 mounds (approximately ¼ cup) of batter into the pan flattening with a spatula. (I used my cookie scoop to do this).
Reduce heat to medium
Sauté until golden brown and cooked through, about 4-5 minutes per side.
Adding 1 more tablespoon of oil when cakes are flipped.
Repeat with remaining batter.
Serve with raita.
*A note about herbs – I used basil because it is what I had, the original recipe called for mint instead. You
can use what you have or what you like. My favorite fresh herb is thyme so I often add it even when it doesn't call for it. Remember no recipe is set in stone and it is up to you to make it so it is pleasing to you and your eaters. If you like what you made write it down, if you don't it is no big deal just try again at the next meal. The more you experiment and find what you like the more comfortable you will be in the kitchen and the more fun you will have!

Do you eat the shell?

So we also carved pumpkins recently - this was my 3 year old's first carving experience. The look of shock and astonishment and joy that registered on his face when he first stuck his hand into the ooey gooey innards of his pumpkin was priceless to watch.


After scooping the goo and separating the seeds he loved to squish his hands around in the seed bowl, which we finally had to put an end to since his next favorite thing was to lift his seed covered hand out of the bowl and shake it thus flicking sticky seeds all over the kitchen.
So I took the seeds and washed them then spread them on a sheet pan to dry overnight. I did this because I was ready for bed and didn't want to wait up for roasting seeds. So they next day I roasted. The only thing I put on my seeds are olive oil and kosher salt. I am the only one in the family that really like them so I keep them in my truck for snacking on - super healthy, right Doctor?! So here is my question for all you  (and Dr. Crystal) do you eat the shells or do you take the time to crack them open and extract the seeds? I eat them whole. Always have. Sometimes I encounter a shell that I can quite chew up so I spit that part out. Is there any extra fiber benefit to eating the shells?

Happy Halloween to you all!!

Sunday, October 23, 2011

Halloween & Pumpkin Seeds

It was pumpkin carving day at our house today!

The boys were up to their elbows in guts but the hard work paid off as we enjoyed the glow from our jack-o-lanterns!


Afterwards, I rinsed the seeds we saved, tossed them with olive oil, salt, and spices and turned them into yummy, crunchy goodness!

Toasted Pumpkin Seeds
Start with about 3 cups rinsed, well-drained pumpkin seeds. Preheat your oven to 350 then spread seeds on a baking sheet, drizzle with olive oil, and season with generous amounts of your favorite seasonings (I used kosher salt, pepper, onion powder, granulated garlic, cumin, coriander, and a small amount of cayenne pepper).


Toss to coat. Bake at 350 for 30-40 minutes, scraping and mixing seeds every 10 minutes, until seeds are beginning to brown, smell toasty, and just begin to pop. Scrape up any stuck seeds and spread to cool.


Store at room temperature in an airtight container for up to a week or so...if they last that long! As Little C says, "these are so AWESOME!"

And they just might be the perfect snack for this time of year; pumpkin seeds are great source of zinc which boosts your immune system! (For more health benefits of pumpkin and more pumpkin recipes, check out last year's Hey Punkin' and I Love Pumpkins posts.)

Tuesday, October 18, 2011

Save the Tatas!!

October is Breast Cancer Awareness month so I felt it would be timely to post about dietary considerations for breast cancer prevention. Are there specific nutrients and foods we should be consuming to take better care of our tatas? Certain regional diets show protection or increased risk of developing breast cancer: Traditional Oriental diets are associated with a very low risk, Mediterranean diets with an intermediate risk, and Western diets with a very high risk. So what are people eating (or not eating) that is affecting their risk of developing breast cancer? Research surrounding nutrition and breast cancer wants to focus on specific isolated factors in foods that may protect against breast cancer development. As Steve Austin, ND puts it in the book Breast Cancer: What You Should Know (But May Not Be Told) About Prevention, Diagnosis, and Treatment:

Researchers are now trying to prove that broccoli protects against cancer because of its sulforaphane content. But others say it must be the beta-carotene. Some feel the high level of vitamin C in broccoli may be responsible. Glucaric acid in broccoli has its advocates too, as does indole-3-carbinol. Who knows? It could be the fiber. Researchers are keeping busy looking for the magic bullet when they already have a veritable assault rifle to use against cancer. Attempts to attribute its effects to any on ingredient miss the boat; such efforts don't necessarily even constitute good science. Perhaps it just doesn't sound intellectual enough to say "Eat broccoli—it's good for you," though that may well be what we need to hear.

Cruciferous Veggies
like broccoli, cabbage, and Brussels sprouts protect against cancer. There are many compounds in cruciferous veggies that have mechanisms of action that protect against breast cancer. Indole-3-carbinol (I3C) deactivates estrogen (and increased life time exposure to estrogen is linked to increased risk of breast cancer). Isothiocyanates, such as sulforaphane found in broccoli, increase the activity of enzymes that detoxify cancer-causing agents. Glucaric acid found in broccoli interferes with mammary cancer in rats, most likely due to its ability to promote the body's ability to excrete cancer-causing chemicals. (Other foods high in glucaric acid include oranges, carrots, spinach, and apples.)

Fiber in whole grains, fruits, veggies, legumes, nuts & seeds helps prevent the reactivation of estrogen by gut bacteria and reabsorption by the body. Lignans, a specific type of fiber found in the highest concentration in flaxseed, interfere with estrogen activity. Adding 2 tablespoons of freshly-ground flaxseeds to your daily diet is a simple thing you can do to increase your daily fiber consumption and protect against breast cancer.

Soybeans contain numerous compounds that protect against breast cancer. Genistein, a phytoestrogen, interferes with the formation of new blood vessels—it can cut off the blood supply to cancerous tumors. Phytoestrogens (found in all plants) bind to estrogen receptors in the body in the place of estrogen, effectively blocking estrogen and encouraging its excretion. There are some problems with soy—it has become very prevalent in our diets, it is highly allergenic and difficult to digest, and is typically genetically modified. (I will explore soy more in-depth in a future post!)

Fat, if we eat too much and the wrong type, can increase our risk of breast cancer. Research often shows mixed results, but looking carefully at the data shows us that in cultures where less than 20% of calories come from fat breast cancer incidence is lower than in cultures where greater than 20% of calories come from fat. Rates of breast cancer are even greater in cultures where 35-40+% of calories come from fat. The Nurse's Health Study reported no relationship between dietary fat and breast cancer, but these results are misleading – none of the participants were categorized into the <20% range that seems to be protective when you look at cross-cultural data. Fish and olive oils are cancer protective—their higher levels of omega-3 fatty acids reduce inflammation. Being obese increases your risk of breast cancer because the body stores estrogen in fat.

Eat Organic!
Pesticide residues collect in fatty tissues, like the breast and many have estrogenic effects. "According to the [EPA]'s own data, at least 67 currently used pesticides cause cancer in animals." If you are not vegetarian, it is especially important to eat organic animal products because pesticides in feed and hormones used in raising commercial meat are stored in the fat of the animals in high concentrations. See my previous posts about milk and beef for more information. Certain foods fruits and veggies are more important to eat organic than others—basically, the thinner the skin, the more pesticide residue. For more detailed info, check out the Environmental Working Group's 2011 Shopping guide for the "dirty dozen" and "clean fifteen."

This post is just the tip of the iceberg when it comes to eating well for cancer prevention. For more detailed information, I highly recommend the book How to Prevent and Treat Cancer with Natural Medicine by Michael Murray. I'll end with another quote by Steve Austin, ND that sums things up nicely, "Vegetables, fruit, and fish provide protection. Beans, whole grains, nonfat yogurt, and olive oil are fine. Other nonfat dairy products are okay in moderation. But most of the rest of the American diet is linked with trouble."

Yours in health,
Dr. Crystal

Wednesday, October 5, 2011

...and Schnitzel with Noodles!

I loved Chef Brett's post about her favorite things (and I totally have baker's envy for that beater blade)! It inspired me to post about my favorite kitchen gadgets too--and while they don't involve schnitzel, they kind of have something to do with noodles...


I love my small-volume liquid measuring cup. I use this whenever I am making dressings or marinades from a recipe and any other time I need to measure any liquid volume in teaspoons, tablespoons, or less than 2 ounces.


My girlfriends bought me my microplane grater for my birthday years ago and I use it any time I need to zest citrus or grate chocolate. Sometimes I'll use it for garlic or fresh ginger when making soup or stirfry.


Chef Brett introduced me to this favorite: a digital probe thermometer. I use it to make this:


Lime-honey-blackberry glazed pork tenderloin... And any other meat I'm roasting or grilling (like Earl Grey and Lemon-Brined BBQ'd Thanksgiving Turkey)! It has pre-set temps for various meats and levels of doneness and you can also set it for any temp you need. This is indispensable in my kitchen--I use it at least weekly.


For years I wanted a mandonline slicer and I finally bought myself this $40 version last year. I was never sure if I would use it enough to justify the storage space, but the answer is a definite yes! This inexpensive one works fine, but I fantasize about this one made by Kai... Drool...

I told you there would be noodles--my favorite use for this tool is to make this:


Zucchini "noodles" sauteed in butter and olive oil with garlic, onions, chicken, Parmesan, and herbs. So tasty! It is also great for making my latest favorite indulgence: three cheese scalloped potatoes. There really is nothing healthy about this dish but it is amazingly delicious and I reserve it for that 10% of the time when I don't worry about what I'm eating (since I try to make healthier choices 90% of the time).


Speaking of unhealthy choices, I use this favorite gadget--my immersion blender--to make this:


BACON JAM!! Chef Brett and I made this recipe together last month and it's phenomenal! Again, so not healthy but it feeds the foodie's soul so that's healthy in a whole other way, right? I also use my immersion blender to make salsa, peanut sauce, soups--any time the recipe says "transfer to blender" I get to skip that step (as well as the blender lid and hot food flying all over the kitchen) thanks to this wonderful thing. It even has a mini food processor attachment that's great for chopping nuts, herbs, garlic and ginger paste...

So, those are a few of my favorite things--what are yours?

Dr. Crystal

Pickled Beets

I learned this year that I love pickled beets on a tuna fish sandwich! My mom used to make pickled beets and, as a child, I thought they were gross. Isn't it wonderful how our tastes evolve? That's why we have a rule at our house that you have to try everything on your plates. I never make my kids eat something they really don't like, but they have to at least taste it--it's a pleasant surprise to all of us when they realize they like something they thought they didn't. They don't like pickled beets much yet, but who knows, they might change their minds!

Start with 2 dozen small beets, tops trimmed off, leaving an inch or so of stems and the roots on, scrubbed well. Simmer, covered, until fork tender. Reserve 1 cup of cooking liquid, drain beets, and spread on a cookie sheet to cool enough to peel.


I found that wearing rubber dishwashing gloves worked perfectly for peeling--the textured grips made peeling a snap and my hands didn't turn pink!

Peel then slice into 1/4 inch slices--you may want to halve them if you prefer smaller pieces. Return to the pan along with:

3 medium onions, sliced into 1/4 inch slices
1 cinnamon stick
6 whole cloves
1 cup reserved beet cooking liquid
2 cups apple cider vinegar
1 1/4 cups sugar
2 tbsp salt


Bring to a simmer, simmer 5 minutes, remove cinnamon stick, and keep simmering while you pack into hot, sterile jars. Fill jars to within 1/2 inch of the top. Process in a boiling water bath for 10 min. (For more information about how to can, I found this nice description plus pictures at canningbasics.com.)


This recipe should make about 4 pints.

Now you have pickled beet yumminess to get you through the winter--and they are so pretty too, thanks to all those wonderful antioxidant anthocyanidins!!

Yours in health,
Dr. Crystal